
안녕하세요, MoonLight입니다.
DeepSeek의 다양한 Model들 중에, Multimodal Model인 DeepSeek-VL을 소개해 드리고, 간단한 사용법도 같이 알려드리고자 합니다.
1. DeepSeek-VL
DeepSeek-VL은 Open Source Vision-Language 모델입니다. 입력으로 Image와 Text를 같이 받을 수 있는(Multimodal) Model입니다.
Logical Diagrams을 분석/작성하거나, Web Pages 작성, Formula 인식, 학술 논문 분석, 사진 분석/처리 등과 같은 Image에 대해서 다양한 작업을 할 수 있다는 의미입니다.
특징
- Multimodal Input : Image와 Text를 동시에 입력받아 처리할 수 있습니다.
- DeepSeek 기반 모델 : 강력한 성능으로 알려진 DeepSeek Model을 기반으로 합니다.
- Open Source : 모델 가중치(weights)가 공개되어 있어 연구 및 개발 목적으로 자유롭게 활용할 수 있습니다(MIT license)
- 다양한 크기 : 비교적 작은 모델(예: 1.3B 파라미터)부터 더 큰 모델(예: 7B 파라미터)까지 공개되어, 사용 환경에 맞춰 선택할 수 있습니다.
- 성능 : 공개된 벤치마크에서 다른 Open Source Multimodal Model들과 비교했을 때 경쟁력 있는 좋은 성능을 보여주었습니다. 특히 Image에 대한 이해와 추론, 대화 능력이 뛰어난 것으로 평가받습니다.
- 활용 분야 : Image Captioning, 시각적 질문 답변(VQA), Image 기반 채팅 등 다양한 Multimodal Task에 활용될 수 있습니다.

따라서 DeepSeek 계열 모델 중 Image와 Text를 모두 처리하는 Multimodal Model이 필요한 경우, DeepSeek-VL이 좋은 선택지가 될 수 있습니다.
2. 종류
DeepSeek-VL은 현재까지 VL2까지 나와있습니다.
VL1
Models
https://huggingface.co/collections/deepseek-ai/deepseek-vl-65f295948133d9cf92b706d3
DeepSeek-VL - a deepseek-ai Collection
deepseek-ai 's Collections
huggingface.co
VL2
Paper
https://arxiv.org/abs/2412.10302
DeepSeek-VL2: Mixture-of-Experts Vision-Language Models for Advanced Multimodal Understanding
We present DeepSeek-VL2, an advanced series of large Mixture-of-Experts (MoE) Vision-Language Models that significantly improves upon its predecessor, DeepSeek-VL, through two key major upgrades. For the vision component, we incorporate a dynamic tiling vi
arxiv.org
3. Example
DeepSeek-VL2를 사용하는 방법을 따라하면서 사용법을 보여드리겠습니다.
3.1. github에서 Source download
아래 Link에서 DeepSeek-VL2의 Source를 받고, 적당한 곳에 압축을 풀어줍니다.
https://github.com/deepseek-ai/DeepSeek-VL2
GitHub - deepseek-ai/DeepSeek-VL2: DeepSeek-VL2: Mixture-of-Experts Vision-Language Models for Advanced Multimodal Understanding
DeepSeek-VL2: Mixture-of-Experts Vision-Language Models for Advanced Multimodal Understanding - deepseek-ai/DeepSeek-VL2
github.com
3.2. 가상환경 생성
저는 Windows에서 Anacoda를 사용했습니다.
python 3.8 이상을 권고하기 때문에 아래와 같이 가상환경을 생성하였습니다.
conda create --name "DeepSeek_VL2" python=3.12
3.3. Package 설치
github에서 제공하는 requirements.txt를 사용할 경우 저 같은 경우에는 몇 가지 문제가 발생하여 requirements.txt를 조금 수정하였습니다.
1) CUDA & cuDNN이 설치된 상황이지만, requirements.txt를 이용할 경우 CPU Version의 Pytorch가 설치됩니다.
그래서, requirements.txt의 첫째줄의 Pytorch 설치부분을 삭제하고, 아래 Link에서 CPU Version의 Pytorch를 수동설치했습니다.
PyTorch
pytorch.org
2) gradio를 사용하지 않을거면 gradio 관련 package설치부분을 모두 삭제합니다.
3) 최종적으로 사용한 requirements.txt의 내용은 아래와 같습니다.
transformers==4.38.2
xformers>=0.0.21
timm>=0.9.16
accelerate
sentencepiece
attrdict
einops
이런 오픈소스가 한번에 모두 깔끔하게 설치되고 실행되면 이상한 일이죠.
이 정도 문제는 발생하고 해결해야 제대로 된 듯한 느낌입니다.
3.4. Inference Example
아래 Code는 Image의 제목과 Image에 몇 몇의 사람이 있는지 물어보는 Code입니다. 과연 어떤 답을 해줄지 기대하면서 한 번 보도록 하죠.
import torch
from transformers import AutoModelForCausalLM

from deepseek_vl2.models import DeepseekVLV2Processor, DeepseekVLV2ForCausalLM
from deepseek_vl2.utils.io import load_pil_images
c:\Users\moonl\anaconda3\envs\DeepSeek_VL2\Lib\site-packages\tqdm\auto.py:21: TqdmWarning: IProgress not found. Please update jupyter and ipywidgets. See https://ipywidgets.readthedocs.io/en/stable/user_install.html
from .autonotebook import tqdm as notebook_tqdm
Python version is above 3.10, patching the collections module.
VL2 Model은 3개 Model의 Pre-Trained Checkpoint 파일을 제공하며, 각각의 Model 크기는 대충 아래와 같습니다.
- deepseek-vl2-tiny : 6.28G
- deepseek-vl2-small : 30G
- deepseek-vl2 : 55G
참고로, 저는 RTX 3070ti 8GB GPU를 사용했는데, tiny Model만 Load가 되고, 나머지 2개의 Model은 Out of Memory 에러를 내면서 Load되지 않았습니다.
최초 실행시 각 Checkpoint 파일을 받는데 꽤 많은 시간이 걸립니다. 차 한잔 하고 오세요~!
# specify the path to the model
model_path = "deepseek-ai/deepseek-vl2-tiny"
#model_path = "deepseek-ai/deepseek-vl2-small"
#model_path = "deepseek-ai/deepseek-vl2" #

vl_chat_processor: DeepseekVLV2Processor = DeepseekVLV2Processor.from_pretrained(model_path)
tokenizer = vl_chat_processor.tokenizer

vl_gpt: DeepseekVLV2ForCausalLM = AutoModelForCausalLM.from_pretrained(model_path, trust_remote_code=True)
vl_gpt = vl_gpt.to(torch.bfloat16).cuda().eval()
c:\Users\moonl\anaconda3\envs\DeepSeek_VL2\Lib\site-packages\huggingface_hub\file_download.py:797: FutureWarning: `resume_download` is deprecated and will be removed in version 1.0.0. Downloads always resume when possible. If you want to force a new download, use `force_download=True`.
warnings.warn(
Special tokens have been added in the vocabulary, make sure the associated word embeddings are fine-tuned or trained.
Add pad token = ['<|▁pad▁|>'] to the tokenizer
<|▁pad▁|>:2
Add image token = ['<image>'] to the tokenizer
<image>:128815
Add grounding-related tokens = ['<|ref|>', '<|/ref|>', '<|det|>', '<|/det|>', '<|grounding|>'] to the tokenizer with input_ids
<|ref|>:128816
<|/ref|>:128817
<|det|>:128818
<|/det|>:128819
<|grounding|>:128820
Add chat tokens = ['<|User|>', '<|Assistant|>'] to the tokenizer with input_ids
<|User|>:128821
<|Assistant|>:128822
입력할 Image와 Text를 설정하는 부분입니다.
filepath에 입력 Image의 path, content에 부분에 입력할 Text를 입력합니다.
제가 입력한 Image는 아래와 같습니다.

저는 해당 Image의 제목을 최소 5단어 이상으로 지어달라고 했습니다.
filepath = "./images/"+ "grounding_conversation_1.jpeg"

## single image conversation example
conversation = [
    {
        "role": "<|User|>",
        "content": "<image>\n<|ref|>Describe the picture with at least 5 English words long.<|/ref|>.",
        "images": [filepath],
    },
    {"role": "<|Assistant|>", "content": ""},
]
GPU로 보냅니다.
# load images and prepare for inputs
pil_images = load_pil_images(conversation)
prepare_inputs = vl_chat_processor(
    conversations=conversation,
    images=pil_images,
    force_batchify=True,
    system_prompt=""
).to(vl_gpt.device)
You're using a LlamaTokenizerFast tokenizer. Please note that with a fast tokenizer, using the `__call__` method is faster than using a method to encode the text followed by a call to the `pad` method to get a padded encoding.
# run image encoder to get the image embeddings
inputs_embeds = vl_gpt.prepare_inputs_embeds(**prepare_inputs)
A matching Triton is not available, some optimizations will not be enabled
Traceback (most recent call last):
File "c:\Users\moonl\anaconda3\envs\DeepSeek_VL2\Lib\site-packages\xformers\__init__.py", line 57, in _is_triton_available
import triton # noqa
^^^^^^^^^^^^^
ModuleNotFoundError: No module named 'triton'
Inference 실행~!
# run the model to get the response
outputs = vl_gpt.language.generate(
    inputs_embeds=inputs_embeds,
    attention_mask=prepare_inputs.attention_mask,
    pad_token_id=tokenizer.eos_token_id,
    bos_token_id=tokenizer.bos_token_id,
    eos_token_id=tokenizer.eos_token_id,
    max_new_tokens=512,
    do_sample=False,
    use_cache=True
)
answer = tokenizer.decode(outputs[0].cpu().tolist(), skip_special_tokens=True)
print(f"{prepare_inputs['sft_format'][0]}", answer)
<|User|>: <image>
<|ref|>Describe the picture with at least 5 English words long.<|/ref|>.
<|Assistant|>: A busy street scene in an urban area featuring vehicles, pedestrians, buildings, trees, and various signs.
제목을 "A busy street scene in an urban area featuring vehicles, pedestrians, buildings, trees, and various signs." 이라고 지었네요.
저는 꽤 훌륭하게 잘 지은 것 같은데, 어떻게 생각하세요?
다른 것도 물어봤습니다.
"How many people are there in the image ?"
이라는 질문에 답변은 아래와 같이 했습니다.
"There are three people in the image."
오른쪽 구석에 검은색으로 어둡게 나온 사람과 반만 나온 사람을 정확하게 인식하는 모습을 보여주고 있습니다.
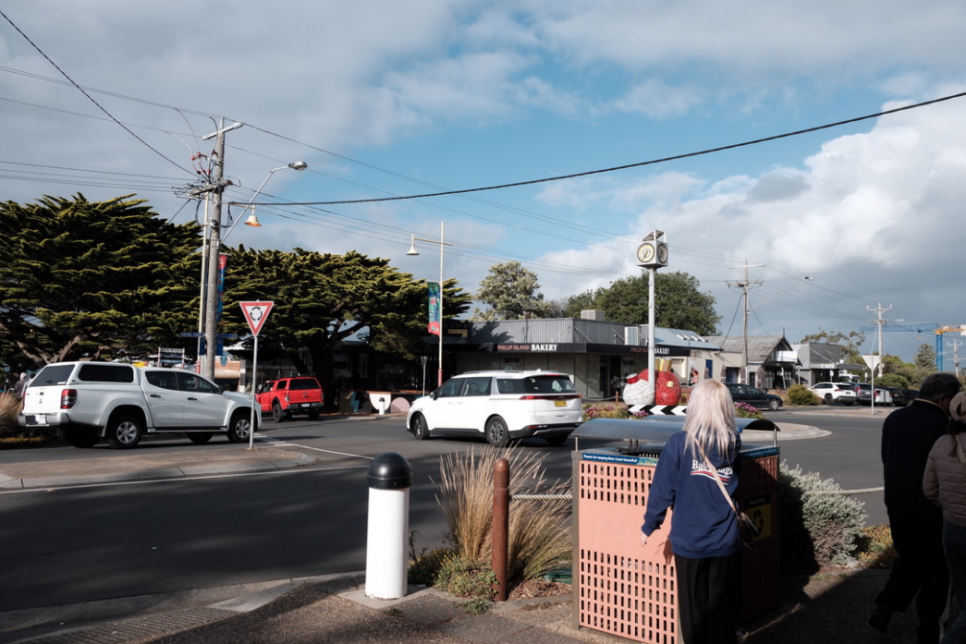
사실 이 질문에는 정확한 답변을 못 할 줄 알았는데, 조금 놀랐습니다.
조금이라도 도움이 되었으면 좋겠네요.
읽어주셔서 감사합니다 !
'Deep_Learning' 카테고리의 다른 글
| Alignment in LLM (0) | 2025.05.13 |
|---|---|
| Downstream in LLM (0) | 2025.04.19 |
| 마누스(Manus) AI Agent 사용기 (0) | 2025.04.13 |
| LoRA(Low-Rank Adaptation) (0) | 2025.04.12 |
| Flash Attention : 더 빠르고 효율적인 Attention 메커니즘 (0) | 2025.04.12 |